
Creating and Editing Observable Protocol Deviations
Not every protocol deviation can be caught automatically. The Compliance & Data Quality Check module continuously scans incoming study data for Programmable issues — deviations an algorithm can detect on its own. Some deviations, however, can only be recognized by a person: a site visit conducted the wrong way, a documented process that wasn't followed, something a monitor noticed during a call. These are Observable issues, and MyRBQM Portal lets authorized users enter them manually, so the Compliance & Data Quality Check page stays the single system of record for both types.
Each Observable issue you create is based on a predefined Observable issue template — an issue definition (with a Category, Sub-Category, Title, and Severity already assigned) that your study's administrator configured in Study Designer as part of the study's Protocol Deviation Plan. You don't define the deviation type yourself; you pick the matching template and describe the specific occurrence.
To create an Observable issue:
- Go to Oversight → Compliance & Data Quality Check.
- Click New Issue at the top of the issues table.
NOTE: New Issue button is only visible to users holding the privilege Create Observable Compliance Issue. If your study has no Observable issue templates configured in Study Designer, the creation button is disabled.
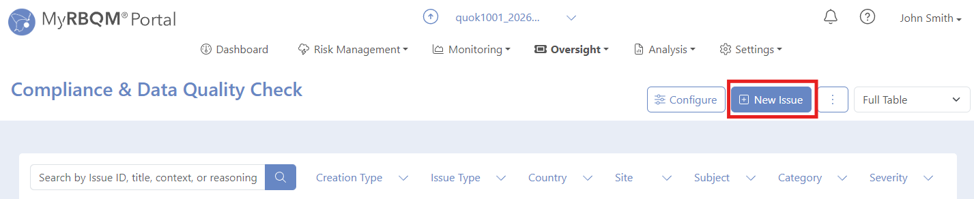
Clicking New Issue opens the Compliance & Data Quality Check – Create New Observable Issue page.
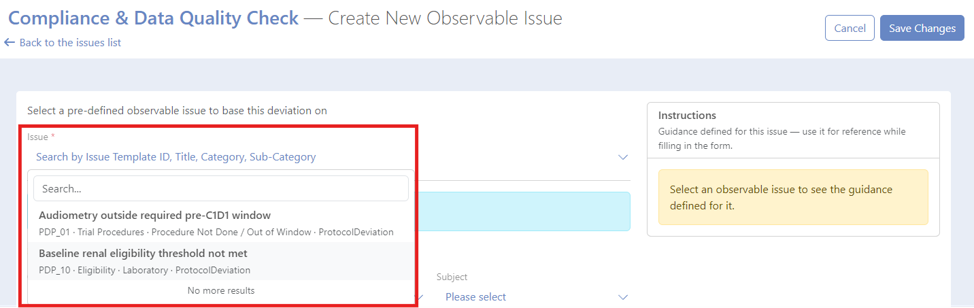
1. Select the Observable Issue Template
Every field on the page stays disabled until a template is.
- Under Select a pre-defined observable issue to base this deviation on, search for and select the template matching the deviation you're documenting. The picker shows each template's ID, Title, Issue Type, Category, Sub-Category and Severity.
- Once selected, Issue Type, ID, Title, Category, Sub-Category, and Severity fill in automatically and can't be changed here — they come directly from the Study Designer configuration.
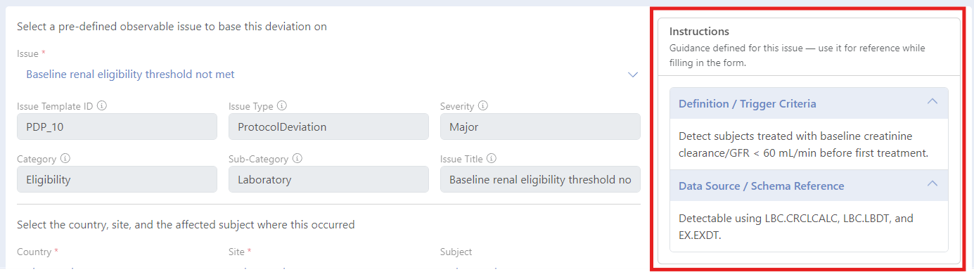
2. Read the Instructions Panel
As soon as a template is selected, a side panel titled Instructions shows the guidance your study team defined for that deviation type in Study Designer — use it as a reference while completing Reasoning and Context fields below.
- Each instruction is grouped under a Topic; click one to expand or collapse its text. The first instruction opens automatically, the rest start collapsed, and you can have several open at once.
- If the template has no instructions configured, the panel reads "No instructions configured for this PDP."
3. Fill In the Issue Details
Below the pre-filled fields, complete the following:
- Country – the country where the deviation occurred. Only countries with active sites are listed.
- Site – select a Site directly (this fills in Country automatically), or select a Subject first, which fills in Site and Country for you.
- Subject – optional. Select the subject the deviation concerns, if any; doing so fills in Site and Country automatically. Leave it empty if the deviation applies at site level rather than to one subject.
- Date of Occurrence – the date the deviation actually happened. Must be today or earlier (UTC).
- Date of Detection – the date the deviation was first noticed. Must be on or after Date of Occurrence and not in the future (UTC).
- Reasoning – free text. Explain what happened and why this is a protocol deviation, with enough detail for QA to assess without follow-up.
- Context – optional free text for any relevant study visit, data, or regulation affected.
- Designee – pre-filled from the study's default designee; change it if someone else should own this issue.
- Due Date – pre-filled as Date of Detection plus the study's configured review period; you can override it.
NOTE: The issue is linked to the Subject if one is selected, otherwise to the Site. Once saved, Country, Site, and Subject can't be changed — if the wrong one was selected, complete or reject the issue and create a new one instead.
4. Review Requirement and Saving
Depending on how Do Observable Issues Require Review? is set on the Configure Workflow page the issue will either be created as Active — First Review Pending (further review process will be required) or as Completed — Verified (no review step will follow after save).
Click Save Changes to validate and save. The new issue then appears in the issues table with Creation Type Observable — filter by Creation Type to view Observable and Programmable issues separately. Its Source is recorded as MyRBQM-Manual, and who created it and when is captured for the audit trail.
The creation of an observable issue is logged in the Change History table as the first row with Review Status = First Review Pending, and in the Study Audit as Create observable issue.
You can edit an Observable issue for as long as it's Active:
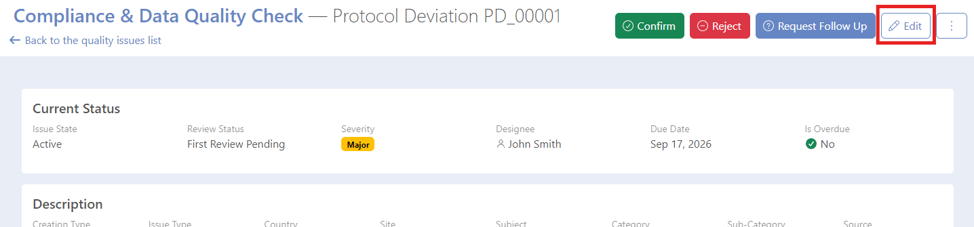
- Open the issue's details page and click Edit — shown only for Observable issues, and enabled only if you hold the Company Administrator privilege (to be updated to another privilege) and the issue is still Active.
- Date of Occurrence, Date of Detection, Reasoning, Context, Designee, and Due Date can be changed. Issue Type, Issue Template ID, Title, Category, Sub-Category, Severity, Country, Site and Subject stay read-only.
- Click Save Changes to apply your edits, or Cancel to discard them.
Every edit is recorded in the Study Audit as Update observable issue, and adds a new row to the issue's Change History with Review Status Edited.
